Here is the second part of the article about the clematis I am growing in our garden and how I do it. To read part 1 please follow this link.
The Third Established Variety of Clematis We Had in Our Garden in 2018.
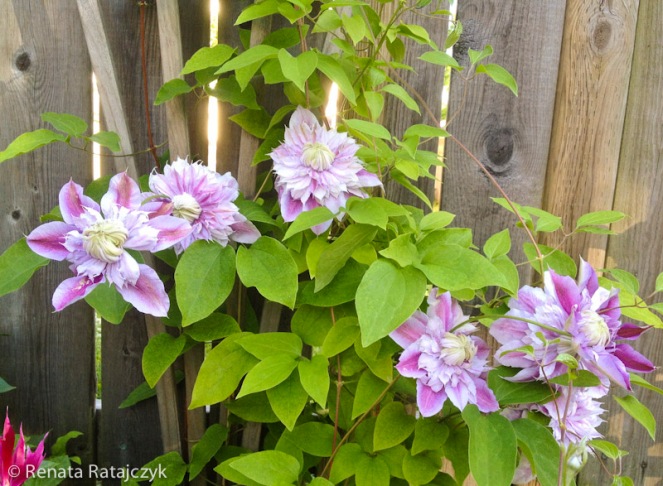
Besides the two established clematis varieties I have just described in part one of this article, in 2018 we also had one more variety of clematis – “Josephine“. Its flowers were lighter pink with quite different shape than the other two kinds. They were also bigger and not as many as on other clematis, but I think they lasted longer. I purchased “Josephine” in the middle of July of 2016, so it was its third year in our backyard. This was the first clematis to bloom in our garden in 2018.
Here you can see it below in several pictures.

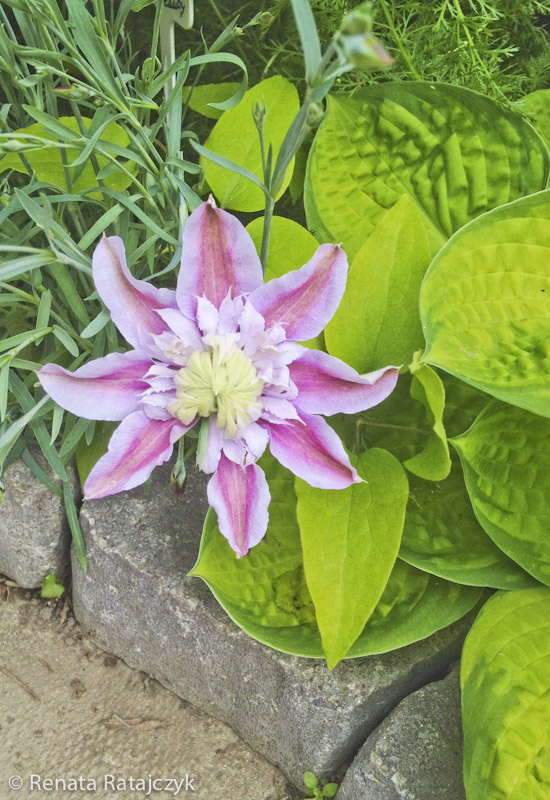
It has fully double flowers and it is interesting, that the flowers’ shape changes over time. The individual flower can last up to a month and in time the outer petals drop and just center part remains creating pompom effect.
This clematis was named “Josephine” to commemorate the fact that it was found by Josephine Hill as an unnamed clematis. It was then launched as a new variety by Raymond Evison in 1998 during the Chelsea Flower Show.
Here is a closer look at its flowers.
Here you can read more about it and maybe buy one for yourself on Raymond Evison’s website.
Last year this clematis bloomed for a few months, but then most of the flowers were gone. Maybe because it was a very hot summer. Other years sometimes it was also blooming even in late summer with a couple of flowers.
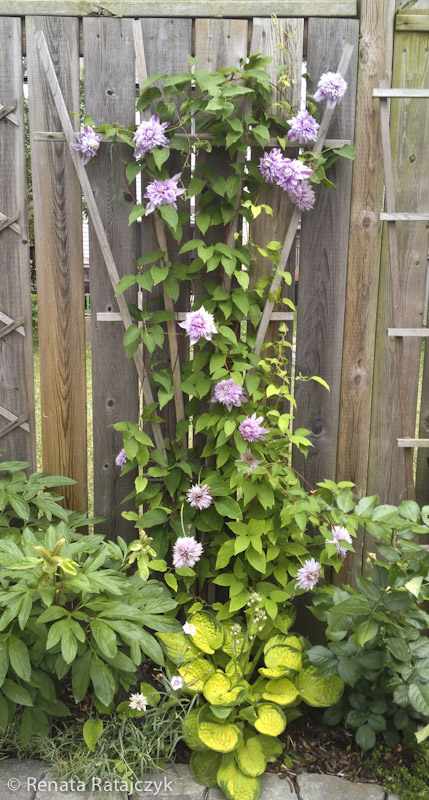
Here it is how it looked beside some other plants in our garden in the second week of June 2018. It is facing West-North and perhaps it would grow bigger when provided with more light.

How I Am Growing My Clematis Plants.
Choose the Right Location and Shade the Roots Area.
First of all you need to choose the right location for your clematis. Generally they like a lot of sun, but there are also some varieties that do quite well in some shade. I have heard that clematis don’t like to have their “feet” (ground area at the bottom of the plant) exposed to the direct sunlight, but I have also heard it is just a myth. Nevertheless, to be on a safe side, I keep the ground at the bottom of the plant where the roots grow well shaded. You can do it in various ways.
What I usually do, is just put some smaller plants at the bottom of clematis to cover the root area. However it is important to select for this purpose only smaller plants, or if choosing some bigger one, to place them further away, so their roots system won’t damage clematis’s roots. Also instead of using other plants to shade the ground, you can just place there some woodchips or small stones, as long as you still allow the stems to spread freely and grow. What I use are some woodchips, small herbs, smaller kind of hostas, annual flowers or Scotch moss.

When planting clematis, it also important to choose a location with a well draining soil. If the water likes to stand there, it is not a goo place for your clematis. If the soil is heavy clay, make the hole a few times bigger than the roots and mix the soil with some compost, peat most or other lighter good quality soil. If I don’t have good compost, I usually add some well composted manure to the planting hole and mix it well with the soil. You can also add a little bit of bone meal to help the roots to get established faster.
Plant It Deeper than It Was Growing in the Pot.
Important is to plant your clematis about 2-2.5″ deeper than the soil level it was growing at in the pot. You do that to help the plant to grow more new stems and to help to protect it from clematis wilt. In case of clematis wilt, the plants have a bigger chance to recover if the roots are deeper.
Provide the Right Support for Your Clematis.
You also need to provide some support for the clematis vines to grow around it. When choosing the support, you need to keep in mind a final size of the plant. Leave some space between the support and clematis, but not too much. Maybe about 30-50 cm (about 1 foot or a little bit more). You might need to help the plant to catch onto the support initially.
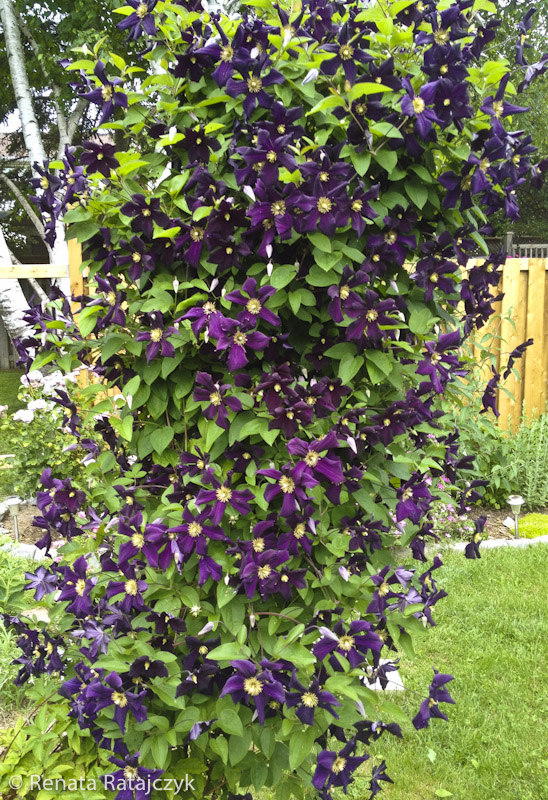
Here below you can see the support I have provided for my dark-purple clematis – a metal gate. I have added a bit of wire to it as well to create more space for my clematis to attach and climb.
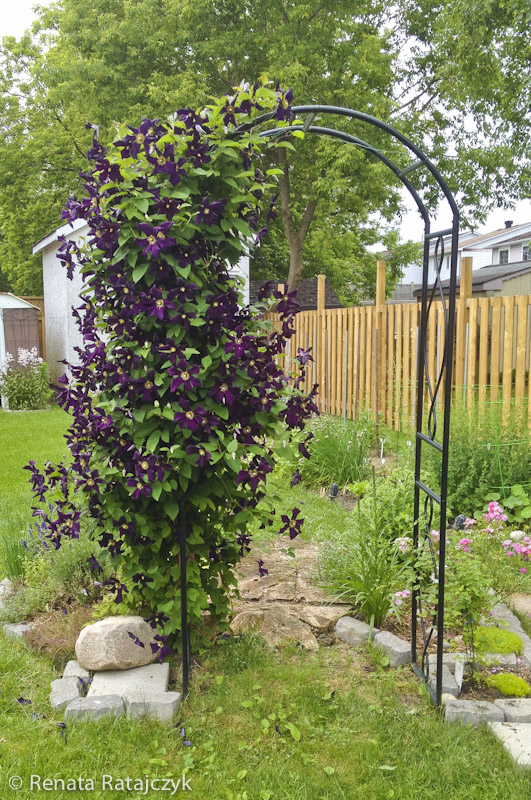
Do not place your clematis too far from the support. I made this mistake when planting my purple clematis, as you can see in the below picture. Now it has a hard time reaching the support and I help it to find it by extending a piece of wire towards the gate. I should have planted my clematis right on the side of the gate where now the stones are.

How I Fertilize Our Clematis.
Once my clematis plants are established, which is usually in the next growing season, I mostly use natural fertilizers, but occasionally I also add some synthetic one for flowering plants. In the early spring, I place around my clematis some composted manure (usually cow’s or cow-ship mix). You can use good quality compost as well. Just make sure it is from plants which were grown organically and no weed killers were used. Since my dark-purple clematis grows beside calcium loving herbs, I also add some bone meal once or twice per year. I am not sure it helps this clematis, but at least it doesn’t seem to hurt it.
Then later in the season I add some natural fertilizers, like the one made by earthworms. The brand I use has volcanic minerals added to it and is called Worm Gold. I have purchased it via mail order from a Canadian company T & T Seeds here.
I think it is really good and I also use it to grow my vegetables and for many other plants. You just need a little bit, so the bag can last for a pretty long time. You might be able to buy a similar mix, but not necessary with volcanic minerals or kelp added to it, at some good plant nurseries.
At other times, I also occasionally add a bit of synthetic fertilizer for flowering plants when my clematis start to bloom and maybe once or twice later during the summer.
Last year I have also used a few times some natural liquid kelp fertilizer. I have later read it actually is very good for clematis and helps it to bloom well. So maybe it was one of the reasons why they have grown even better than the previous year.
How to Prune Clematis. Varieties of Clematis and Which Plants Might Grow Well with It.
Most of clematis need to be occasionally pruned. How to prune them depends on clematis variety. In the case of my clematis, most of them die to the ground, perhaps because of the pretty harsh climate we are in (zone 5 b). I need to cut back the dead stems once the new growth appears in spring.
There are 3 basic groups of clematis. To find out what kind of clematis you have and how to prune them, check out this excellent article from the “Fine Gardening” magazine here.
Clematis and roses are a classic combination. If you would like to know which other plants might go well with clematis, I recommend you also read “Fine Gardening” magazine’s article on this subject.
There are really so many varieties and styles of clematis to choose from, I am sure you will find something to your liking. They can look quite different and prefer other growing conditions. Here is one more article from the “Fine Gardening” magazine you might like to read to see what I mean.
The Update About “Rebecca” Clematis in Our Garden.
As I have promised in the previous article on clematis, I will now show you how our new “Rebecca” clematis looked later in the summer and early autumn once it started to grow and bloom again.
Here is “Rebecca” how it looked around the end of August 2018, almost 2 months later from the time it was planted.

As you can see, it got established quite a bit and started to bloom again with just a few flowers. I have shaded its roots with sweet potato plant, which was growing like crazy last year and I had to cut it back several times, or it was shading some smaller plants too much.
On the right of “Rebecca” there is pink Penstemon flower (perennial in our zone 5B climate), which was also a new addition to our garden last year. It was blooming really well all the time till frost. I also had blue Penstemon closer to clematis, but this one probably died, maybe shaded too much by sweet potatos’ leaves.
There are also some gladiolus flowers and our new hydrangea from the Peniculata group – a variety called Little Quick Fire from Proven Winners. I purchased this hydrangea because it is one of the first hydrangeas to bloom and it doesn’t grow too big. We will see how it will be doing in our garden. So far, it was doing well and started to bloom soon after I have purchased it. It was also recommended by one of my favorite gardeners and garden designers – Laura from Garden Answers.
Here is a closer look at the flowers of our “Rebecca” clematis.

I am curious to see how it will be doing this year. I hope it will be blooming as profusely as some of our other clematis.
Following and Sharing this Blog.
If you like this blog post, please “like” it and share it with other people who might be inserted in reading it as well. Thank you. I encourage you to follow or subscribe to my blog to receive automatic updates, so you won’t miss future posts. I look forward to your comments.
The Copyright, Usage Licence and Fine Art Prints.
All photographs and this article are copyrighted by me, Renata Ratajczyk unless otherwise mentioned. I you would like to use any of them in your publications, on your website, or purchase these photographs as fine art prints, please contact me.
My Other Blog – Light Vision.
If you like this blog, you might also like to visit my other blog – Light Vision, where I write about photography, art and travel. Thank you for visiting, liking and sharing my blogs.
Other Articles You Might Also Like to Read.
- Growing Clematis – Part 1.
- Tulips in Our Garden In 2018.
- Villa Garzoni Gardens, Italy – Part One – Meet some Cheeky Fantasy Animals.
- Villa Garzoni Garden, Italy – Part Two.
- How to Choose the Best Tomato Plants For Your Garden – Part 1.
- Visiting Niagara Park’s Botanical Gardens, Part 1.
- Visiting Niagara Park’s Botanical Gardens, Part 2.
- Roses Blooming in our garden – Part 1.
- Roses Blooming in our garden – Part 2.
- Plants Which Can Thrive on Neglect – Part 1.
- A Beautiful Italian Garden For You to Visit – “Giardino Sigurtà” in Valeggio sul Mincio, Northern Italy.


Your tips are very helpful. Used them and even shared on my blog rooms209.wordpress.com about how to grow buddleia.
LikeLike
Than you very much for your comment. I am happy to hear you like my gardening tips and shared them. I hope they have helped you to grow beautiful buddleias.
LikeLike